Showing posts with label BBQ. Show all posts

Saturday, 14 June 2025

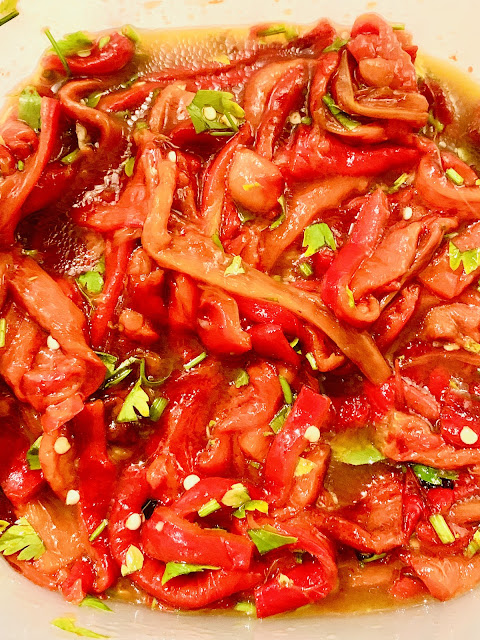
Roasted or Grilled Peppers


Warning, home roasted/grilled peppers are addictive, and a lot of peppers roast down to a not enough.  They are just so tasty and moreish.

Serves 4

4 large red, orange, or yellow peppers (green peppers aren't as sweet so I avoid them)
2 tbsp extra virgin olive oil
1 clove of garlic, peeled and crushed
A large pinch of salt
1 tbsp chopped broad leaf parsley

Place the peppers in an ovenproof dish or tray and grill under a medium high heat until the skins starts to blister and blacken.  This could take 5-10 minutes depending on your grill, possibly even more.  They can be roasted in a hot oven with other dishes, but this takes longer.  Grilling on a barbecue also works well.

When blackened on one side turn them over with tongs and repeat on the other side.

Once blackened on both sides, and collapsed, place the hot peppers into sealable pot, ideally once you can store and serve them in.  Seal the pot and leave for 20 minutes or so to cool enough to handle.

When cool enough, peel the skin off the peppers, remove the stalk, slice in half lengthways,  remove the seeds and slice into thin strips.

Toss in the olive oil, crush garlic, salt, and parsley.  Leave for about 20 minutes for the flavours to mingle if you can.

Serves as an accompaniment, or on bruschetta.

Instagram: leesashomemade
Facebook: Leesa's Homemade
Thursday, 16 November 2023

Foolproof Peri Peri Mayonnaise


My daughter has become addicted to Peri Peri Mayonnaise.  The list of ingredients on shop bought is long, so I decided to make some with half the ingredients. This mayonnaise is foolproof with a stick blender.

1 free range egg
1 heaped tsp dijon mustard
1 tsp white wine or cider vinegar
1 clove of garlic, peeled & crushed
1 tsp hot chilli flakes
1 tsp paprika
1 large pinch of salt
200ml light olive oil or vegetable oil

Place all the ingredients into a stick blender beaker.  

Put the blender stick right down to the bottom of the beaker.  On the fastest speed, start blending slowing pulling the stick up through the mixture. By the time you get to the top of the mixture, the mayonnaise should be well blended and thick.  

Check for seasoning. You might want a little more vinegar or salt.  Blend again, pushing the stick down and up again slowly, and your Peri Peri Mayonnaise is done.  

Ours all went into a Tuna & Sweetcorn Mayonnaise Pasta, but it will last 1 week in the fridge.

Instagram: leesashomemade
Facebook: Leesa's Homemade

Tuesday, 12 July 2022

Yotam Ottolenghi's Chaat Masala Potatoes with Yoghurt, Coriander, & Tamarind


Yotam Ottolenghi’s Chaat Masala Potatoes with Yoghurt, Coriander, and Tamarind courtesy of The Happy Foodie. A wonderfully easy, flavoursome dish. I made it as a side with some left over Tandoori Chicken from the bbq at the weekend. Do hunt out Chaat Masala spice. It makes all the difference.

Serves 4 as a side dish

750g baby new potatoes, cut lengthways into 1cm-thick slices
2 tbsp olive oil
1 tsp chaat masala
½ tsp ground turmeric
250g Greek-style yoghurt
½ small red onion, peeled and thinly sliced
1 green chilli, thinly sliced into rounds
1½ tsp coriander seeds, toasted
1½ tsp nigella seeds, toasted
Salt

For the coriander chutney:
30g fresh coriander
1 green chilli, deseeded and roughly chopped (10g)
1 tbsp lime juice
60ml olive oil

For the sweet tamarind dressing:
1½ tbsp shop-bought tamarind paste (I used ready sweetened & spiced Maggi Tamarind Sauce)
1½ tsp caster sugar
¼ tsp chaat masala

1. Preheat the oven to 220°C fan.

2. Put the potatoes and 2 teaspoons of salt into a medium saucepan and top with enough cold water to cover by about 4cm. Place on a medium-high heat, bring to the boil, then simmer for 6 minutes, or until they’re almost cooked through but still retain a bite. Drain through a sieve and pat dry, then transfer to a large parchment-lined baking tray and toss with the oil, chaat masala, turmeric, ⅓ teaspoon of salt and a good grind of pepper. Roast, stirring once or twice, for 35 minutes, or until deeply golden.

3. Meanwhile, make the coriander chutney. Put all the ingredients and ¼ teaspoon of salt into the small bowl of a food processor and blitz until smooth. Set aside until needed.

4. For the tamarind dressing, whisk together all the ingredients in a small bowl with 1½ teaspoons of water and set aside.

5. Spread the yoghurt out on a large round serving platter. Top with the coriander chutney, swirling it through without completely incorporating. Drizzle with half the tamarind dressing, and top with the potatoes, onion and chilli. Drizzle over the remaining tamarind, then sprinkle over the seeds and serve.

As usual, I didn't quite follow the recipe. As one child is not keen on coriander I decided against stirring it into the yoghurt, and then decided to omit yoghurt entirely. The sauces were served separately to everyone's individual taste. The tamarind dressing was a big hit! I used dried chilli flakes instead of green chilli, and didn't bother with coriander and nigella seeds.

Instagram: leesashomemade
Facebook: Leesa's Homemade
Twitter: leesashomemade

Thursday, 15 March 2018

Merguez Burgers

Just chillin'
Merguez are traditionally finger thin North African sausages made popular in France with the arrival of immigrants from Algeria and Morocco.  'Merguez Frites' (Merguez & chips) is a popular fast food served out vans, hole-in-the-wall cafes, and bistros and much loved by our children, and us.

I do have a sausage maker, but time is short, so Merguez flavoured burgers it as birthday treat #2 for my now 15 year old, to be cooked after yet another parents' evening.

500g minced lamb
1 thick slice of bread
1 tsp harissa
1/2 tsp salt
1 tsp smoked paprika
1/2 tsp chilli powder
1 tsp ground coriander
1 large clove of garlic, crushed
1 free range egg

Make the slice of bread into breadcrumbs in a mini food processor.

Put all the ingredients into a large mixing bowl and mix thoroughly with your hands.

On a greased baking tray, divide the mixture into half, and then each half into three.  I found it makes 6 burgers weighing just over 100g each which seems a good size for a 'healthy' burger.

Chill in the fridge on the baking tray as long as you can to make them nice and firm for frying.

Fry over a medium heat for about 5 minutes each side for a well done burger.  Or bake at 200C Fan on the baking tray.

Serve in a burger with salad and onion, in a pitta, or with pasta as I will probably do.

Twitter: Leesa@sunhillcurry
Instagram: sunhillmakesbakes

Friday, 25 September 2015

Homemade Tomato Ketchup

A tomato glut is something I never had, but when a friend posted on Facebook that she had too many beef tomatoes so the idea of trying to make ketchup came to mind. There are loads of recipes on the web, but this is the one from www.deliciousmagazine.co.uk was the one I settled on, partly because it coincided with the weight of tomatoes I was given.

Ingredients
2kg tomatoes, roughly chopped
2 onions, chopped
2 garlic cloves, chopped
150ml red wine vinegar
100ml water
½ tsp black peppercorns
1 blade mace (I didn't have any so I used 1/4tsp ground nutmeg instead)
4 allspice berries (Didn't use any as ones I thought I had were juniper!)a
2 cloves
½ tsp crushed dried chillies (used only 1/4tsp as our chilli flakes are really hot, then saw the note about omitting this if making for children!)
2 bay leaves (forgot to add them!)
1 tbsp light brown sugar

Put tomatoes, garlic, 50ml of the vinegar and the water into a large saucepan and simmer gently for 40 minutes until the vegetables are soft and pulpy.

Whilst the tomatoes are cooking, put the rest of the vinegar into a little saucepan together with the  all the other ingredients apart from the sugar.  Simmer over a low heat for 10 minutes then turn off and leave to one side.

After 40 minutes, puree the tomato pulp with a stick blender then strain and rub the pulp through a sieve into a clean pan.  Make sure you get as much of the tomato pulp through the seive as possible, only leaving the seeds and skins behind.

Strain the vinegar and spices into the pan with the sieved tomato.  Add the sugar and simmer over a medium heat until thickened and reduced to a thick consistency, about 500ml.

Remove from the heat and season to taste. Pour the ketchup into a jug and use a funnel to transfer it into sterilised bottles or jars. Seal immediately and cool completely before labelling and storing.

Instagram: sunhillmakesbakes 

Saturday, 7 September 2013

Spicy Korean Roast Leftovers Rice Salad


We had quite a lot of lamb left over from our Moroccan Butterflied Leg of Lamb last weekend, so after seeing Korean Stir-Fried Rice on Jamie's Money Saving Meals I thought I'd try to recreate the distant memory of a spicy Korean rice salad we enjoyed several times in a New Zealand shopping mall over 15 years ago.  And it makes a pleasant change to having simple cold meat, veg, & potatoes midweek.

Based on what we had in the cupboards, this is what I put together

Serves 1

1/4 mug brown or white rice
Large handful of swiss chard or other leafy greens
Handful of leftover roast (lamb, beef, pork, chicken)
1 large clove of garlic
1/2 medium sized onion
1 tsp hot chilli flakes
2tbsp white wine vinegar
1 heaped tsp redcurrant jelly (I used bramble jelly)
1 tbsp sesame seeds

Cook the rice according to the packet's instructions.  Finely shred the chard and wilt in the pan with pan with the rice for the last couple of minutes of cooking.  Drain and leave to one side.

Finely chop the meat, garlic, and onion and mix with the remaining ingredients.  Mix together with the warm rice, season with salt and pepper to taste, and either eat immediately or leave for the flavours to develop.

Wednesday, 4 September 2013

Moroccan Roast or Barbecued Butterflied Leg of Lamb

We cooked our first butterflied leg of lamb on the barbecue in July, and our return from nearly a month in France and the continuing good weather seemed the opportunity to try it again - with some different flavours.

The Moroccan flavours were loosely based on Jamie Oliver's Moroccan Roast Lamb from Jamie Does...Spain.  I mixed up 4 tsp ground cardamon, 2 tsp ground cumin, 1/2 tsp hot smoked paprika, a big pinch of coarse salt, a big pinch of black pepper.  The butterflied leg of lamb was rubbed first in a large crushed clove of garlic, then the spice rub, and finally I poured over the juice of 1 lemon onto both sides and put it into a plastic bag on a plate in the fridge to marinade overnight.

Weighing 1.9kg we cooked the joint for 40 minutes with the lid of the barbecue closed, resulting in it being not as pink as we like it but still perfectly moist.  It did however prove quite hard to cook it fat side down as the barbecue kept flaring up.

We served it with Charlotte and Pink Fir Apple potatoes, and runner beans out of the garden. We are having the remaining half of the lamb cold tonight with pasta and green salad.

Monday, 22 July 2013

Sunday 'Roast' Barbecued Butterflied Leg of Lamb

Our local butchers had vacuum packed butterflied (boned and opened out) legs of lamb on display this week.  After having it on a rugby club barbecue several years running it has always been something I wanted to try,

I asked for a small leg of lamb to feed our family of five, which the butcher duly boned.  I marinaded it in 2 tsp of olive oil, the juice and zest of a lemon, 1tsp of dried thyme, 1 tsp dried oregano, a large garlic clove grated, and a pinch of pepper and salt for the best part of a day in the bag I bought it in which made it easy for the marinade to have full contact with the meat.  I meant to marinade it overnight but didn't get round to it.

Cooking times came from www.beeflambnz.co.nz which recommended 30-35 minutes cooking time for a small leg, and 40-45 minutes for a large leg, was spot on.  Our Sunday 'roast' turned out moist and pink all the way through.

We served it with new potatoes and French Carrot Salad.

Barbecued Garlic & Chilli Prawns - Gambas Pil Pil

I thought I'd treat us all to some barbecued prawns at the weekend.

I googled Gambas Pil Pil and discovered that this seemed to be shelled prawns 'boiled' in hot garlic and chilli infused oil.  So, instead, I just marinaded the prawns in their shell, in their bag with a 1tsp  olive oil, one crushed garlic clove, a pinch of chilli flakes, and a pinch of rock salt. for most of the afternoon.

When ready to barbecue, thread the prawns onto two skewers so you can turn the whole lot over easily during cooking (NB use a cloth to pick up the skewers as they get bl**dy hot as I discovered).  Cook for about 5 minutes turning a few times until browned on the outside.  Leave to cool a little before peeling!

Oh and don't forget to keep the heads, shells, etc.  They make a great Soupe de Poisson.

Tuesday, 2 July 2013

Roasted or Barbecued Bell Peppers

Yeah it's barbecue season, at least it was over the weekend.

If we remember, we put veggies on the barbecue before or after the meat. On Saturday we remembered to roast the two red peppers floating around in the salad draw for nearly a week.

To make a vegetable side dish you'd need a couple of peppers each.  Red, yellow, or orange peppers are the ones to choose.  We only had two ramiro peppers left, so this made a little 'salsa' to go with our homemade burgers.

For those who don't like peppers, I would urge them to try this.  Roasted peppers are indescribably sweet, and nothing like their 'acidic' fresh former selves.  Removing the skin also makes them gentle on the stomach as 'repeating' is another complaint levelled at raw peppers.

Simply grill the whole peppers, stalk and all, on the barbeque until the skin is blackened.  At this stage 7 year old Sprout was entirely put off.  Leave the peppers to cool then peel off the charred skin, remove the stalk and seeds and slice into rounds as if it was still crispy.  Toss in a little olive oil, a small clove of crushed garlic, and chopped flat leaf parsley.  A handful of pine nuts could be added to stretch this a little if you have some.

If not barbecue weather, peppers can charred under the grill.

Monday, 24 June 2013

Babaganoush - Charred Aubergine Pate


Most people, when we tell them what Babaganoush is, decide they aren't going to like it.  I guess many people aren't sure about aubergines as in themselves they can be a little bland.  But once tried, Babaganoush, is one aubergine dish that seems to be able to change people's minds.  And it is incredibly moreish.

Babaganoush is a charred aubergine pate or dip.  I came across Babaganoush in Egypt, first in beachfront shacks in the then undeveloped Sharm el Sheik, and then in my Scottish boyfriend's flat in Alexandria where we learnt to char the aubergines stabbed onto forks over the uncontrollable gas burners.  And it is the charring that is the key to this pate's flavour.  That and the tahini paste.

1 large aubergine
1 clove of garlic
1 tbsp tahini paste
Juice of 1 lemon
1-3 tbsp olive oil
1/2 tsp cumin (optional)
Pepper & salt to taste

Slice the aubergine down the middle lengthways and place flesh side down under a medium hot grill on a baking sheet until the skin blackens and blisters.  Remove from the grill and leave to cool for a few minutes. Alternatively place whole on a barbecue to soften and blacken all over.

Place the rest of the ingredients into a mini food processor then scrape in the inside flesh of the aubergine.  Don't worry if some of the charred skin comes with the flesh - this adds to the flavour.  Blitz together until smooth.  You may need to add some olive oil to achieve this.  Season to taste.

Babaganoush is great on hot toast or warmed pitta bread.

Instagram: leesashomemade
Facebook: Leesa's Homemade

Monday, 10 June 2013

Leftover Burger Bolognaise Pasta Sauce


The three homemade burgers leftover from the barbecue this weekend have already been transformed into Bolognaise Sauce for the kids tea tonight.

I fried some a finely chopped small onion and a clove of garlic in 1tbsp of olive oil in a frying pan, added the burgers which I had whizzed into a rubble in the mini food processor.  Then whizzed up a tin of tomatoes in the food processor and added this and 1/2 a can of water to the pan.

After 20 minutes of simmering the sauce is now ready.

Instagram: leesashomemade
Facebook: Leesa's Homemade